Apple Experiment~ Simple Second Grade Science Fun!

Apple week is so much fun! One of my favorite activities is to introduce the scientific method to my kiddos with a quick and easy science experiment. It takes just a few easy-to-find materials and a few minutes of time~ the perfect combo for the busy teacher!

We wanted to see which liquid would keep our cut apple slices from turning brown. You know the experiment and the results! In a perfect world, each student would ideally have their own apple slices and materials, but we did it whole-group instead. This was such a great way to set up the table and all of the credit goes out to my student teacher, Liz, for this one!

A while ago, I came across this great recording sheet to use.


  Each child came up to the table to make their observations. 


 We also put the apple under the document camera and displayed it on the SMART Board so everyone could see!


This was super simple, apple~icious science fun!
 The kiddos loved being little scientists and I loved watching their excitement! 
Back to School All About Me Projects

I have lots of favorite projects, but this one tops my list for back to school!
 It was easy, fun and so darn cute!
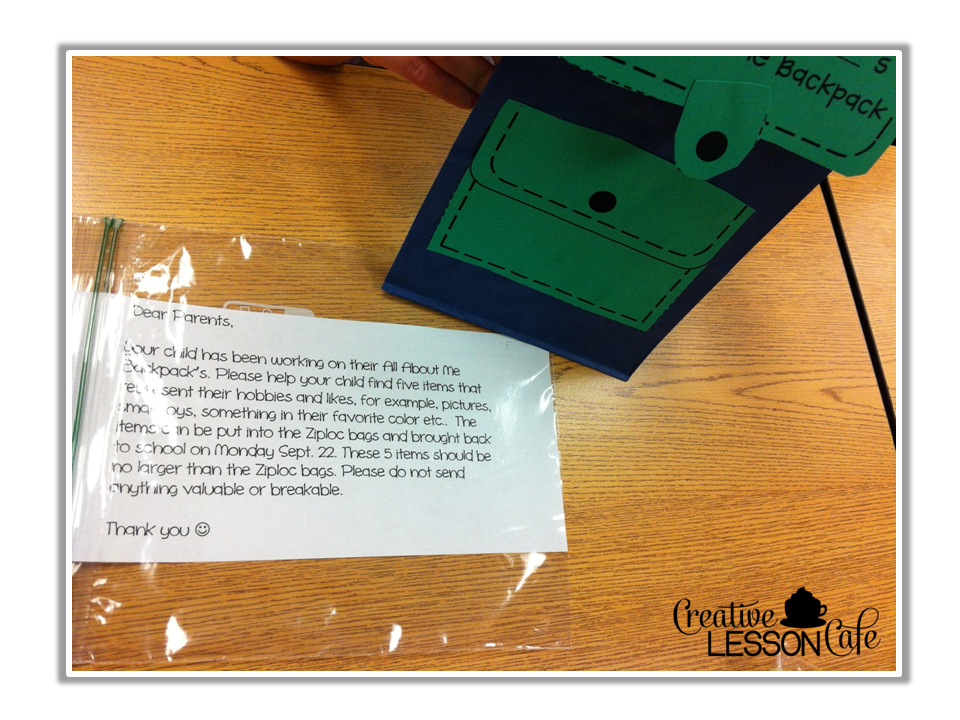
 We made All About Me Bagpacks!

This is a twist on the original project by the clever Brooke Hilderbrand, but I just had to have these blue lunch bags from Target! We chose green cardstock for the rest of the backpack pieces, but they can be copied on any color for use with a traditional brown bag!

The back of the bag has information for the student to fill in about themselves, their likes and things that make them special. I sent a copy of the back side as a home assignment, so the parents could help their children with correct spelling. We recopied the words onto the green paper in class.
Step by step and piece by piece, the children assembled the bags. We did this as a whole class activity for our Fun Friday. The bags stayed in the room over the weekend to dry.

A note went home in a Ziploc bag asking the parents to help their little ones gather five items that could generate some ideas that the children could tell to their classmates as a getting to know you activity. 
Some brought in pictures, others found a favorite toy or a medal they had earned. The only requirement was that it had to fit in the baggie. On Monday, we gently placed the items in the bagpack. 

As a listening and speaking activity, the students shared their project by reading the back side aloud and then showing and telling about their items on the document camera. They loved that part the best! 
 This little princess shared her crown! Smiles!

Some students brought in funny toys that did silly things and we all had a good giggle too!
I can't wait until the parents see the finished project come home! They will love them! 

My class used to do a similar project in a "me box", but since I am pretty much brown bag project crazy, I will definitely do this one again next year! If you'd like to grab a copy for yourself, you can find it here!

If you love this lunch bag craft, stop by again soon.
My class is working on a cute little brown bag book for apple week. :)


Fall Sequencing Fun! There was an Old Lady Who Swallowed Some Leaves!

Happy (almost) Fall one and all! The leaves have not changed colors here yet but other signs of fall have arrived. The heat is running in the morning hours but it's still warm enough in the afternoon for the swarming BEES to go all crazy, chasing the kiddos (and the teachers) at recess! Anyway, I've had lots of requests from my sweet friends for more sequencing sets so I thought I'd make a fun activity for a favorite Fall read aloud! 

I just LOVE this book!


If you are new to sequencing sets, all you do is print the picture cards, ordinal number cards and number cards on cardstock and laminate them. They may be used as retelling sticks or placed in a pocket chart for center time or a whole-group activity.


I have displayed them on a whiteboard to rearrange as we read the story and also as a cut and paste onto construction paper sequencing activity. My second graders will use the writing pages to complete a written summary using transitional words and phrases.


Lucille Colandro's Old Lady... series of books are perfect for thematic units!
 I hope you will love this set my friends! 

Happy Teaching!


Number Corner Set-Up Photos~ Our Calendar Math Powerhouse!

Today's photo tour post is dedicated to all of my Bridges in Mathematics friends who have just been handed your brand new series and the loads of great materials that come along with it. I hope you will get some good ideas for your room too, even if you don't use Bridges!  

Getting set-up for Bridges number corner activities and math workplace stations can be confusing at first. I'm a visual person, so to get ideas for my set-up, I searched the web for photos of how other teachers set up their rooms. I am here to pass on some classroom photos for others who are searching too.

This is my September number CORNER for second grade (a work in progress), which actually is more like a HALF WALL. 


The biggest black pocket chart EVER needs its own bulletin board. 


Because this chart is now the focal point in my room, I went to work adding a pop of color with a poppin' patterns calendar set to match my room theme. 


I replaced the month header with a colorful one and placed small calendar numbers in front of the white cards. Once turned over, the numbers hide behind the larger card.

The letters from this easy bulletin board titles set came in handy for this colorful sign I printed on Astrobright paper.


 Make Way for Number Corner!
Room Arrangement Tips

  • You will need quite a bit of room for displays, materials and for a gathering area, so rearrange the desks and tables to create an open space. 
  • Two bulletin boards are helpful. One is for the jumbo pocket chart and the other to hang the Daily Rectangle grid. You can see the red and blue tiles on my grid. 
  • Below the grid, consider using a shelf to store your teacher number rack, student whiteboards, workplace bins or any materials you will need handy during number corner. 

  • There are many items to prepare for displays, vocabulary work and activities for each month. These will need to be hung as well. I have mine on two whiteboards next to the pocket chart.
  • It is recommended to have a chart stand for your calendar grid observation charts and monthly skill charts that need to be created on large paper. I typed mine up and will someday enlarge them as posters so they can be saved and reused. Plus, I had to add some clipart from Melonheadz!
 These charts change every month, so I am hoping that having a master in digital format will make editing easier.


Super Teacher Tools

Because many daily activities require that you record using a dry erase or wet erase marker, it is helpful to have a magnetic marker holder and whiteboard eraser. 


I also purchased magnetic sentence strips from Lakeshore for the calendar collection titles and date. 


My favorite purchase is the small black storage ottoman from Target that I use as my teacher stool/ binder rest. I love that I can be down at the students' level.

 I'm sure my number corner will evolve as I figure things out and see how they work for my class.
 I will keep you updated!

 Now if I could only make sense of my binders... 
If you have Bridges, you know what I mean!

Have a happy rest of the week!


Magic Reading Tracking Wands for Beginning Readers

Abracadabra! Make magic reading wands appear! This is such a simple way to encourage young learners to track along when reading and to engage your students who wander off the page, distracted. I tell my littles that their eyes need to be on the words and then the magic wands will help them become better readers. 


To make the wands all you need are some craft sticks, glue and glitter. Simply add a generous blob of glue to one end of one flat side of the stick and sprinkle on the magic sparkles!
I usually make them on a Friday and let them dry over the weekend. 


Bigger is better when it comes to glitter!
 I have noticed that the brands with the largest flakes hold up the longest. 

We are only into our first full week of school, so I am just getting to know my students as readers. We work on most stories in September as a whole group until the kiddos are all tested and leveled. 


With our bright sticks, it is easy to see at a distance who is having a hard time following along. The kids always love using their wands and it is well worth the ten minutes spent to make them!


Maybe you can use a little magic prop for your readers too. 
Why not give it a try?


Always Remember! Patriot Day Coloring and Writing Pages Freebie for 9/11

We will always remember where we were, what we were doing and the events of that day.
  Even more importantly, we will always remember the victims, families and heroes of 9/11. 
We appreciate the men and women of the Armed Forces who keep us safe and protect our freedom!

Although my students are too young to truly understand its significance or the details of the event, we will spend some time discussing simply that September 11th is an important but sad day in the history of our country. 

Last year, I shared these two simple pages I made for my little ones to show their patriotism.


I will have them copy from the board and color this page to take home.
 Parents can decide how much information they feel is appropriate to share with their child.

We will write something like this:

September 11th is a time to remember the victims, their families and the heroes of that tragic day.
 We love our country.

If you think you might want this for your class too you can download a copy here.

Always remember!


Teacher Lesson Plan Book Makeover: From Drab to Fab!

I cringed the other day as I handed off an ugly brown school-issued plan book (the one that comes with carbon paper in the back) to my student teacher. Yes, they still exist! Personally, I prefer to have my lesson plans in an actual book I can carry around, rather than on the computer or in a binder. There are lots of reasons for this, but mainly because it is what I am used to! Plus, I can work on plans in the waiting room, outside while monitoring recess, at team meetings or wherever else my book can travel!

The format of my favorite FREEBIE plan book from Lakeshore is perfect for my planning needs! I love the layout, but the cover....not so much! This book is the focal point of my desk (when it is clean), so I'd like it to reflect my theme and style. So, I hide the cover!


A few years ago, I found some cute and FREE plan book binder covers in a variety of designs from Teaching in Flip Flops. I printed and laminated one, then rolled clear packing tape to the back and stuck it on top of the not-so-attractive cover! Now each year, when I change books, I simply remove the cover from the old book and switch it up! This is year three for my cover and it is still like new!

There are many other things in my room that I want to transform from drab to fab by adding my own cover the same way! I have some oldie but goodie resource books with worn out covers...they are next on the list! :)

I've seen other ideas similar to this for decorating student spiral notebooks and that is just super too!
If you have a great idea, I'd love to hear about it in the comments! 


Related Posts Plugin for WordPress, Blogger...